piablo @ D_D Academy
September 22, 2022
Twitter @ropats16
Created by:
Avatarpiablo @ D_D Academy
September 22, 2022
Twitter @ropats16
Congratulations on making it to this final tutorial in a series on smart contract development of the ERC-721 standard, a.k.a. NFTs. In the first in the track, you created a basic smart contract using Remix. Then a shift to a dedicated developer's environment to create and deploy an NFT contract to an actual test network. In lesson 3 you added tiers to your NFTs, finally learning to make your contracts air-tight by building your own automated testing suite in the fourth of the series.
But to create a full stack decentralised application, we also need a UI, or front-end for users to interact with. In this lesson that is exactly what we're going to create.
Expect somewhere from one to four hours to complete the lesson, depending on your prior experience and the need to grasp new concepts. To help you maintain a steady pace and encourage breaks for rejuvenation, you'll find our pomodoro timer ⌛ in the menu header. It'll remind you to "go touch grass" and appreciate nature's role in enhancing our well-being. 🌱 Relish your journey in development in a good state of mind and body.
Now we're going use all of this knowledge and create a basic NFT minting application that displays the three tiers of NFTs created in our smart contract and gives users a one-click option to mint them. Once minted, users will be redirected to a page that displays information of their mint. We'll need some extra magic to make that all happen.
For handling wallet connections to our application, we'll be introducing you to RainbowKit. And using the provided hooks from WAGMI, we can check the connection to the wallet and call functions from our smart contract through the front-end. RainbowKit and WAGMI are just another couple of shining examples of open source public goods. We love open source at Developer_DAO. And public goods are gooood!
* always make sure you access up-to-date release notes and documentation
Let's dive in!
We're going to start where we left off in Write Automated Tests for your TierNFT.
Open your code editor and
The next command creates a sub-directory named
# create your Next.js application
npx create-next-app frontend --use-npm
For your next steps, choose 'No' to TypeScript, because we want to create a JavaScript project, but choose 'Yes' to all the other options:
Need to install the following packages:
  create-next-app@14.0.4
Ok to proceed? (y) y
✔ Would you like to use TypeScript? … No
✔ Would you like to use ESLint? … Yes
✔ Would you like to use Tailwind CSS? … Yes
✔ Would you like to use `src/` directory? … Yes
✔ Would you like to use App Router? (recommended) … Yes
✔ Would you like to customize the default import alias (@/*)? … Yes
Creating a new Next.js app in ((path)):/developerdao/frontend.
Once the setup is complete, we open the
cd frontend
For users to easily interact with our smart contract and mint the NFTs we must provide an interface. A simple process that is easily accessible. Let's start by creating a way to handle wallet connections.
Install RainbowKit and it's dependencies:
npm install @rainbow-me/rainbowkit wagmi viem
To get this setup we need to start working on the
import "@/styles/globals.css";

export default function App({ Component, pageProps }) {
  return (
    <Component {...pageProps} />
  );
}

export default MyApp;
We need to add some additional imports to create our configurations.
import "@/styles/globals.css";
// new block of imports:
import "@rainbow-me/rainbowkit/styles.css";
import { getDefaultWallets, RainbowKitProvider } from "@rainbow-me/rainbowkit";
import { WagmiConfig, createConfig, configureChains } from "wagmi";
import { polygonMumbai } from "wagmi/chains";

import { alchemyProvider } from "wagmi/providers/alchemy";
import { publicProvider } from "wagmi/providers/public";
import { useEffect, useState } from "react";
// end of new block of imports

// the rest of the function MyApp code...
Hooks are JavaScript functions that manage the state's behaviour and side effects by isolating them from a component.
Because our dApp is going to use WalletConnect, we need a
All good? Okay, let's get back to the
// import statements code...

const { chains, publicClient } = configureChains(
  [polygonMumbai],
  [alchemyProvider({ apiKey: process.env.NEXT_PUBLIC_ALCHEMY_ID }), publicProvider()],
);

const { connectors } = getDefaultWallets({
  appName: "TierNFTs Front-end Integration",
  projectId: process.env.NEXT_PUBLIC_WALLETCONNECTCLOUD_PROJECT_ID,
  chains,
});

const wagmiConfig = createConfig({
  autoConnect: true,
  connectors,
  publicClient,
});

// function MyApp code...
For this application we will continue using the
Set your API Key in a new file named
API_KEY='YOUR-API-KEY-FROM-PROVIDER'
in our case:
  NEXT_PUBLIC_ALCHEMY_ID=
  NEXT_PUBLIC_PROJECT_ID=
  NEXT_PUBLIC_CONTRACT_ADDRESS=
Great! Now we can wrap our application in the
// import statements and configs code...

function MyApp({ Component, pageProps }) {
  return (
    <WagmiConfig config={wagmiConfig}>
      <RainbowKitProvider chains={chains}>
        <Component {...pageProps} />
      </RainbowKitProvider>
    </WagmiConfig>
  );
}

export default MyApp;
Now that we have our application setup, we can edit the Index Page.
Notice that we are using the
import Head from "next/head";
import styles from "@/styles/Home.module.css";

export default function Home() {
  return (
    <div className={styles.container}>
      <Head>
        <title>Create Next App</title>
        <meta name="description" content="Generated by create next app" />
        <link rel="icon" href="/favicon.ico" />
      </Head>
      <main className={styles.main}></main>
    </div>
  );
}
Before we dive into the code for our index page, let's copy and paste some styling from the side drawer below, into our file. This is some default styling created for the application, which you can play around with themes, responsiveness, etc., if needed.
Moving onto imports.
// prev imports...

import { ConnectButton } from "@rainbow-me/rainbowkit";
import {
  useAccount,
  useContractRead,
  useContractWrite,
  usePrepareContractWrite,
  useWaitForTransaction,
} from "wagmi";
import TierABI from "@/artifacts/contracts/TierNFT.sol/TierNFT.json";
import styles from "@/styles/Home.module.css";
import { parseEther } from "viem";
import { useEffect, useState } from "react";
import Image from "next/image";

// function Home() code...
export default function Home() {
  const CONTRACT_ADDRESS = const CONTRACT_ADDRESS =
    process.env.NEXT_PUBLIC_TIERNFT_CONTRACT_ADDRESS || "0x5794c3de7a59587048b76060d282476e12a8aff8"; /* Or enter Contract Address between ''*/;

  const { isConnected } = useAccount();

  const [isUserConnected, setIsUserConnected] = useState(false);
  const [latestNFTMinted, setLatestNFTMinted] = useState(0);
  const [modalShow, setModalShow] = useState(false);

  // More code to come...
}
We're creating a default function called
The initial value also serves as the type for the value assigned. If the initial value is a string, then the values set later must be strings too. The hook can be created without an initial value as well but a good practice is to always choose and pass in an initial value based on the value type we expect to assign to that variable.
We will revisit these state variables later to see their implementation.
We need a
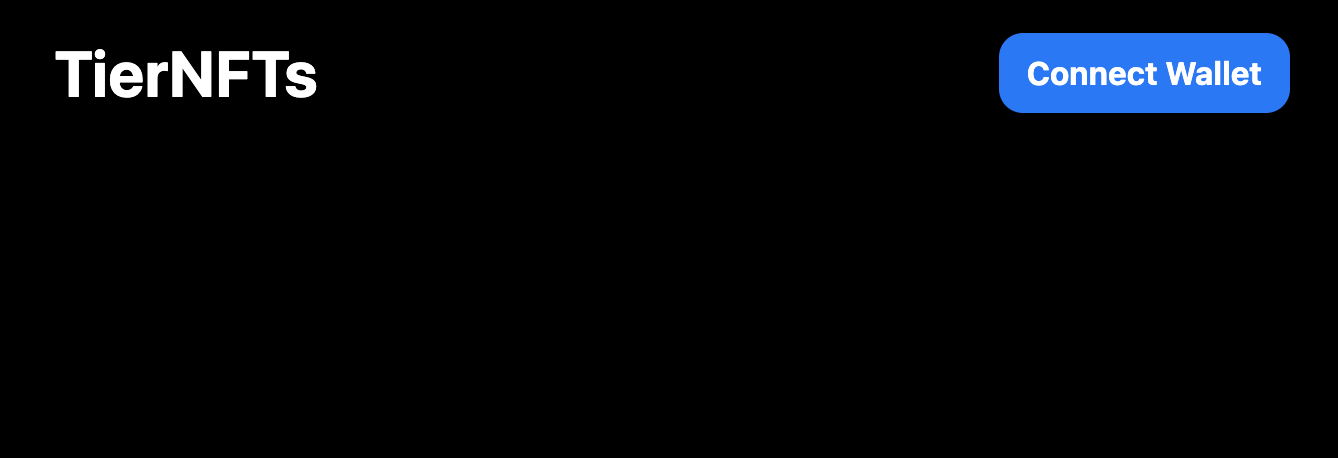
export default function Home() {
  // variable definitions...

  return (
    <div className={styles.container}>
      {/* <Head> element... */}

      <header style={header}>
        <h1>TierNFTs</h1>
        <ConnectButton />
      </header>

      {/* <main> element */}
    </div>
  );
}

// styling code...
Since we care about accessibility, we ensure we are using only a single
With this setup we can run the
Make sure you are in the frontend directory before running the command.
The preview should look like this:
Next we need to create some cards that display the 3 tiers of NFTs we created in our smart contract and provide a way to mint them.
export default function Home() {
  // variable definitions...

  const { config, isLoading: isMintLoading } = usePrepareContractWrite({
    address: CONTRACT_ADDRESS,
    abi: TierABI.abi,
    functionName: "safeMint",
    value: parseEther(mintingPrice), // "0.02"
    // enabled: Boolean(mintingPrice !== "0"), // "true"
  });

  const { data: mintData, write } = useContractWrite(config);

  const { data: txData } = useWaitForTransaction({
    hash: mintData?.hash,
  });
  // return statement for rendering...
}
The useContractWrite hook from
WAGMI let's us pass in the contract address, contract ABI and the function name
to return a JavaScript function (that we have called
How cool is that?!
It also returns some additional features for error handling and checking whether the function is running or completed. We are assigning well defined names to the returned values for easily calling them later. For example, the
Even though we have this function, we need to pass in custom
The
// WAGMI useContractWrite hook...

const mintToken = async (e) => {
  try {
    let mintTxn = await mint({
      recklesslySetUnpreparedOverrides: {
        value: parseEther(e.target.value),
      },
    });
    await mintTxn.wait();
    console.log("This is the mint data", mintData);
  } catch (error) {
    console.log("Error minting NFT", error.message);
  }
};

// function Home() code...
Then we create a new folder named
Save them with the same names as shown in the links above for smooth flow in the code.
Make sure you have downloaded the SVG file and not just saved the URL of the file.
Now we can render our NFT Cards.
// return statement for rendering and <header> element...

<main className={styles.main}>
  <div style={NFTFlex}>
    <div style={NFTCard}>
      Tier 0
      <Image src="/nfts/0_basic.svg" width="200" height="200" alt="Basic Tier" />
      <button
        value="0.01"
        onClick={(e) => {
          setMintingPrice(e.target.value);
          mintToken();
        }}
        style={NFTMint}
        disabled={isMintLoading}
      >
        Mint
      </button>
    </div>
    <div style={NFTCard}>
      Tier 1
      <Image src="/nfts/1_medium.svg" width="200" height="200" alt="Medium Tier" />
      <button
        value="0.02"
        onClick={(e) => {
          setMintingPrice(e.target.value);
          mintToken();
        }}
        style={NFTMint}
        disabled={isMintLoading}
      >
        Mint
      </button>
    </div>
    <div style={NFTCard}>
      Tier 2
      <Image src="/nfts/2_premium.svg" width="200" height="200" alt="Premium Tier" />
      <button
        value="0.05"
        onClick={(e) => {
          setMintingPrice(e.target.value);
          mintToken();
        }}
        style={NFTMint}
        disabled={isMintLoading}
      >
        Mint
      </button>
    </div>
  </div>
</main>

// rest of the code...
Let's see what is happening in each NFT Card by taking
<div style={NFTCard}>
  Tier 0
  <Image src="/nfts/0_basic.svg" width="200" height="200" alt="Premium Tier" />
  <button
    value="0.01"
    onClick={(e) => {
      setMintingPrice(e.target.value);
      mintToken();
    }}
    style={NFTMint}
    disabled={isMintLoading}
  >
    Mint
  </button>
</div>
Great but anyone can view and call our mint functions in the front-end of our app even if their wallet is not connected to the application. This could result in some errors. We must check if a user is connected before we let them interact with our application simply by using the
// consts...

useEffect(() => {
  try {
    setIsUserConnected(isConnected);
  } catch (error) {
    console.log("Error connecting to user", error.message);
  }
}, [isConnected]);

// function Home() code...
The
Then we can wrap the
// return statement for rendering...

{
  isUserConnected ? (
    <main className={styles.main}>{/* NFT Flex div code here... */}</main>
  ) : (
    <main className={styles.main}>
      <div>Please connect your wallet.</div>
    </main>
  );
}

// closing <div> and styling consts...
This
Now our preview should look like this once a wallet is connected:
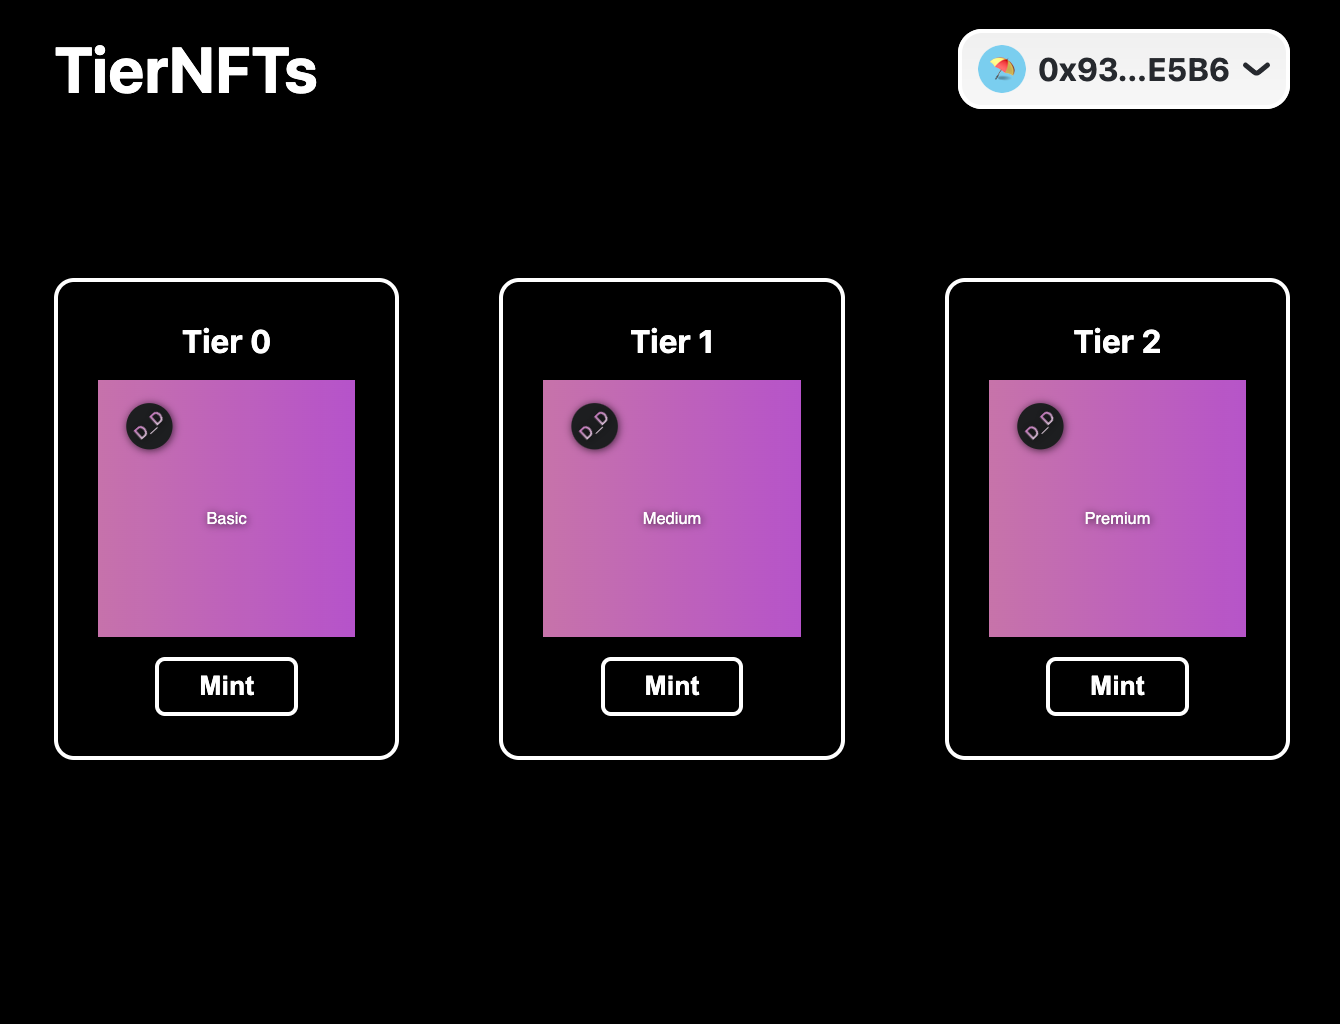
Woohoo! You've done a lot so far. Try minting these NFTs and check your wallet's profile on
Take a breather and stretch yourself before we do the last bit of coding.
Doesn't it feel like we are still missing something?
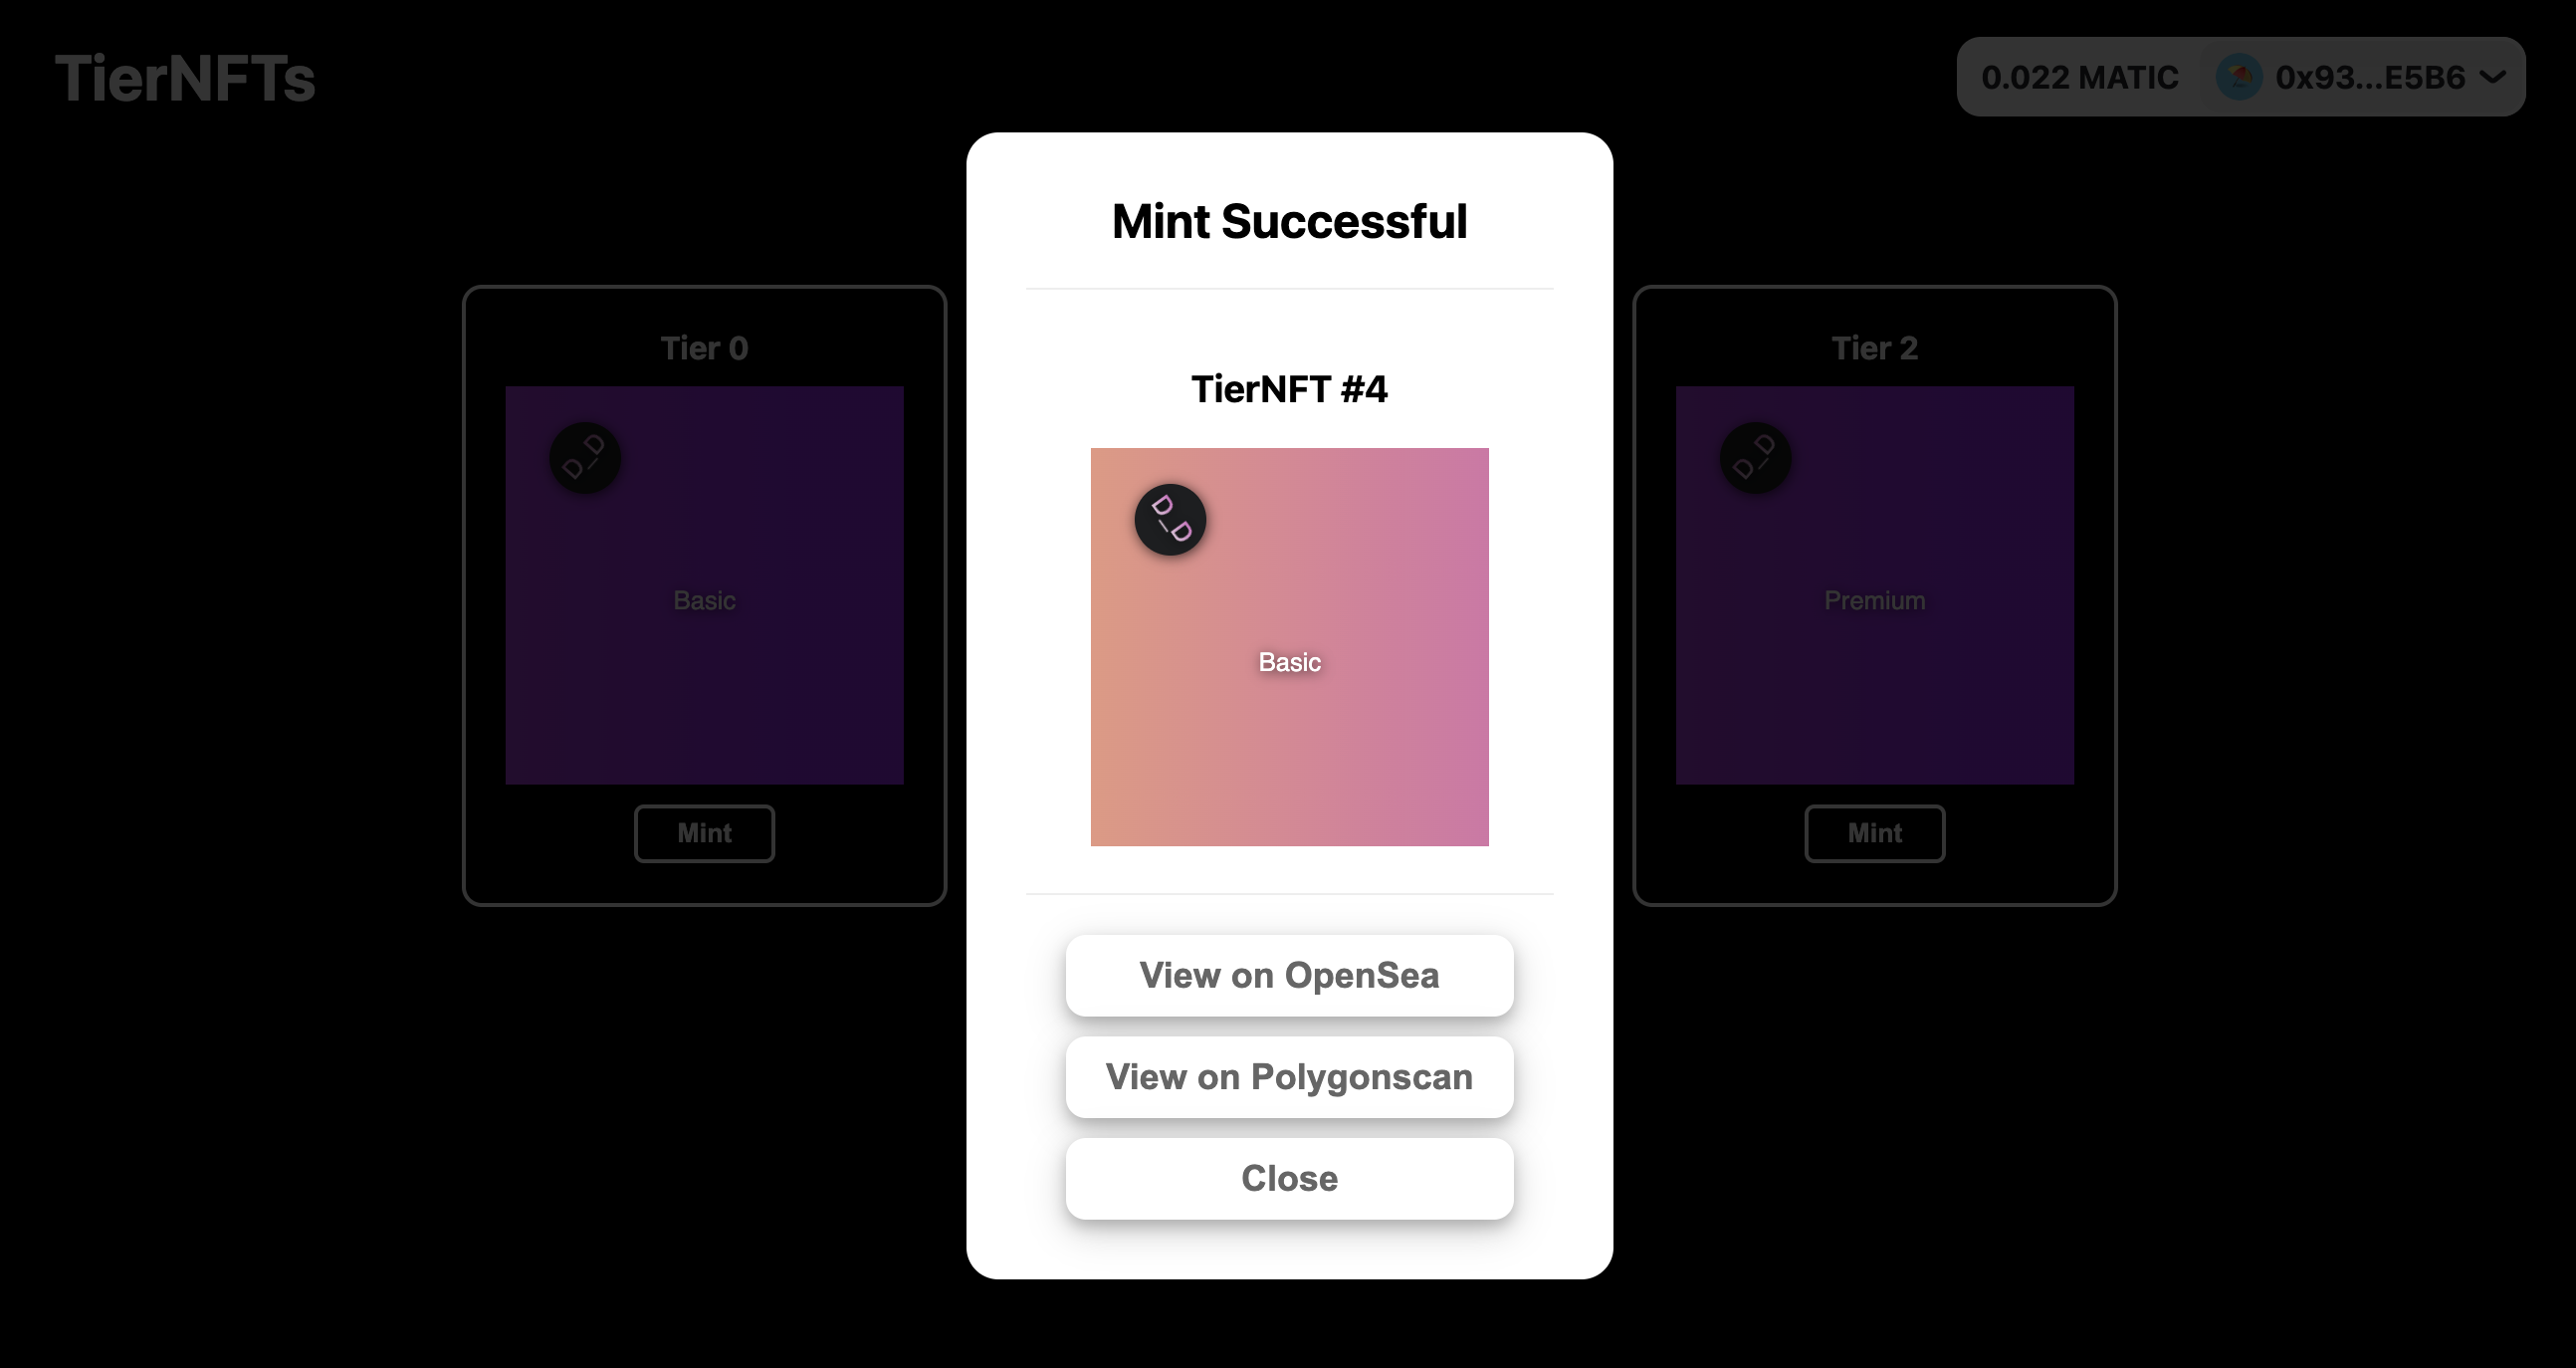
Right! We want our users to see information when they minting. We want them to know when a mint is in progress and we want them to see the result once the mint is successful.
But what is this modal. It is a an element that is usually used as an overlay that provides its own interaction environment separate from the page below it. This interaction environment provides a focus element where only options from this can be selected while it is active.
Okay lets write some code for it.
To be able to display information about our latest mint, we must first get information about it from our smart contract.
// imports, consts and WAGMI useContractWrite hook...

const { data: tokenData, refetch: refetchTokenData } = useContractRead({
  address: CONTRACT_ADDRESS,
  abi: TierABI.abi,
  functionName: "totalSupply",
  watch: true,
  enabled: process.env.NEXT_PUBLIC_CONTRACT_ADDRESS,
});

const { data: tokenURI } = useContractRead({
  address: CONTRACT_ADDRESS,
  abi: TierABI.abi,
  functionName: "tokenURI",
  args: [1],
  watch: true,
  enabled: process.env.NEXT_PUBLIC_CONTRACT_ADDRESS,
});

// useEffect to check user connection...

useEffect(() => {
  try {
    if (tokenURI) {
      setLatestNFTMinted(JSON.parse(window.atob(tokenURI.substring(tokenURI.indexOf(",") + 1))));
    }
  } catch (error) {
    console.log("Error fetching token URI", error.message);
  }
}, [tokenData, tokenURI]);

const mintToken = async (e) => {
  if (mintingPrice !== "0") {
    try {
      setModalShow(true);
      write();
      refetchTokenData(); // <--------- this is the new line: here an exaplanation of the refetchTokenData() Function for i.e.
      setMintingPrice("0");
    } catch (error) {
      console.log("Error minting NFT", error.message);
    }
  } else {
    alert("Please select a tier to mint");
  }
};

// JSX return statement...
We're almost there. We just need to do two more checks before we actually look at our modal. The first is that we must display our modal only when we want it to and the other is to display a loading message until our NFT has successfully minted. This is how the mintToken function should look now:
// useEffect for tokenURI...

const mintToken = async (e) => {
  if (mintingPrice !== "0") {
    try {
      setModalShow(true);
      write();
      console.log("This is the mint data", mintData);
      refetchTokenData(); // <--------- this is the new line: here an exaplanation of the refetchTokenData() Function for i.e.
      setMintingPrice("0");
    } catch (error) {
      console.log("Error minting NFT", error.message);
      setMintingPrice("0");
    }
  } else {
    alert("Please select a tier to mint");
  }
};

// return statement...
When we trigger the
We're there at last! Now we can render our modal.
// return statement for rendering...

{
  isUserConnected ? (
    <main className={styles.main}>
      <div style={NFTFlex}>{/* NFT Card div code... */}</div>
      {modalShow && (
        <div style={modal}>
          {txData === undefined ? (
            <div style={modalContent}>
              <h2>Minting...</h2>
            </div>
          ) : (
            <div style={modalContent}>
              <h2>Mint Successful</h2>
              <div style={modalBody}>
                <h3>{latestNFTMinted.name}</h3>
                <Image src={latestNFTMinted.image} height="200" width="200" alt="NFT Image" />
              </div>
              <div style={modalFooter}>
                <button style={modalButton}>
                  <a
                    href={`https://testnets.opensea.io/assets/mumbai/${CONTRACT_ADDRESS}/${
                      formatUnits(tokenData, 0) - 1
                    }`}
                    target="_blank"
                  >
                    View on OpenSea
                  </a>
                </button>
                <button style={modalButton}>
                  {txData && txData.transactionHash ? (
                    <a
                      href={`https://mumbai.polygonscan.com/tx/${txData.transactionHash}`}
                      target="_blank"
                    >
                      View on Polygonscan
                    </a>
                  ) : undefined}
                </button>
                <button onClick={() => setModalShow(false)} style={modalButton}>
                  Close
                </button>
              </div>
            </div>
          )}
        </div>
      )}
    </main>
  ) : (
    <main className={styles.main}>
      <div>Please connect your wallet</div>
    </main>
  );
}
// closing <div> and styling consts...
This may seem like a lot of code but we're going to look at it in bits:
The final modal should look like this:
If you are stuck somewhere, please refer to the code side drawer below.
Hoorah! We've done it. Pat yourselves on the back and get some ice cream!
Right from learning the basics of smart contract development using solidity to creating a full stack decentralised NFT Minting Application.
Stay tuned for more!